
Our church, Harvest, has decided to have a live stream service beginning at 7pm EST on Saturday, December 24th and continuing through Christmas Day.
Feel free to pass the link to my blog along so that others can watch the live stream.
May you be blessed by the service and may you enjoy the celebration of the gift of Christ.
"Glory to God in the highest!"
Merry Christmas!
Experience a "taste" of Harvest here: Harvest Christmas Celebration
Sunday, December 25, 2011

Friday, December 16, 2011
Healthy -- and MOST Delicious -- Sticky Buns
The title of this post can be taken in so, so many ways.
I'll just tell you that it is not the name of my new workout video.

The title was intended as a shortened version (read: fit in the title bar) of the name of the recipe I am going to gift you with.
Yes, these treats are a gift.
Trust me.
Once you make these sticky buns (Or do I say cinnamon roll? Is there a difference anyway???) you'll never be the same. Or at least, your pants will never fit the same.
"Whoa! Whoa! Hold your horses there just a minute now missy! You said these were healthy."
Ah, yes. Yes, I did.
And since I am trustworthy and truthful, I'll tell you how I've made these healthy as I show you the recipe. (Yes, show -- it's a photo recipe!!) So, on to the healthy cinnamon rolls/sticky buns...
WAIT! Come back. Healthy doesn't have to taste like dirt. Trust me. These taste nothing AT ALL like dirt. Not that I've eaten a lot of dirt. But, I'll take it from my friend Lucy** who, apparently, as a child used to eat the mud pies she made. Enough mud pies to cause worms. Uh, yum!
I digress. You get my point, right? These do not, I repeat, do not taste like dirt!
On to the healthy cinnamon rolls...

You're gonna need all this stuff in the picture there. It all looks innocent enough. And healthy. Definitely healthy.

You see here? This is the first part of the healthy rolls. I am using Canola Oil instead of one of the less beneficial oils. Healthy, right? It had nothing to do with the fact that I was out of Veggie Oil and only had Canola oil on hand. It had everything to do with my desire to make these cinnamon rolls healthy.
Take said oil and the other healthy ingredient: milk. Wholesome. Nourishing. Full of Calcium. Healthy! You'll also need some sugar. Not 'high fructose corn syrup.' Bad stuff. Well, at least that's what I've been lead to believe. But the corn people are trying to change all that. So, sugar too. Again with the healthy.

Anyway, take the oil, milk and sugar and dump them into the biggest pot you've got. Trust me on this one. You're gonna want a pot with lots of stirring room.
Once you've got all the milk, oil, and sugar in your big pot, then "heat over medium heat, but do not allow to boil. Remove and cool to lukewarm."
Yeah, okay. So maybe if you're some fancy schmancy pastry chef, then the above directions make sense to you. Me? Not so much.
All I know is that yeastie beasties can be finicky. Too hot, and they die (is die the right word???)and my rolls come out flat and dense and yucky. Too cold and they don't grow (is grow the right word???) and, again, my rolls come out flat and dense and yucky. Not yummy. Definitely not delicious.
In order to avoid the flat and dense and yucky roll, I use a very, very scientific way of making sure my milk mixture is heated enough. Wait for it... Wait for it...

Like the tattoo? I was ready for another... Heh, heh, heh!
Ah, yes. It is the hold-your-hand-over-the-liquid-to-test-the-heat maneuver. Pretty clever, huh?

Seriously, I just wait for some little foamy bubbles to appear around the edges. (After I've tested the heat-with-my-hand-manuever. Of course.) Then turn the heat off and allow the mixture to cool to lukewarm. (Again using my hand to test -- dipping my finger in the mixture. Burns? Too hot. Comfortable? Just right!)

Sprinkle the wee yeastie beasties over the lukewarm milk mixture and allow to sit for about a minute.

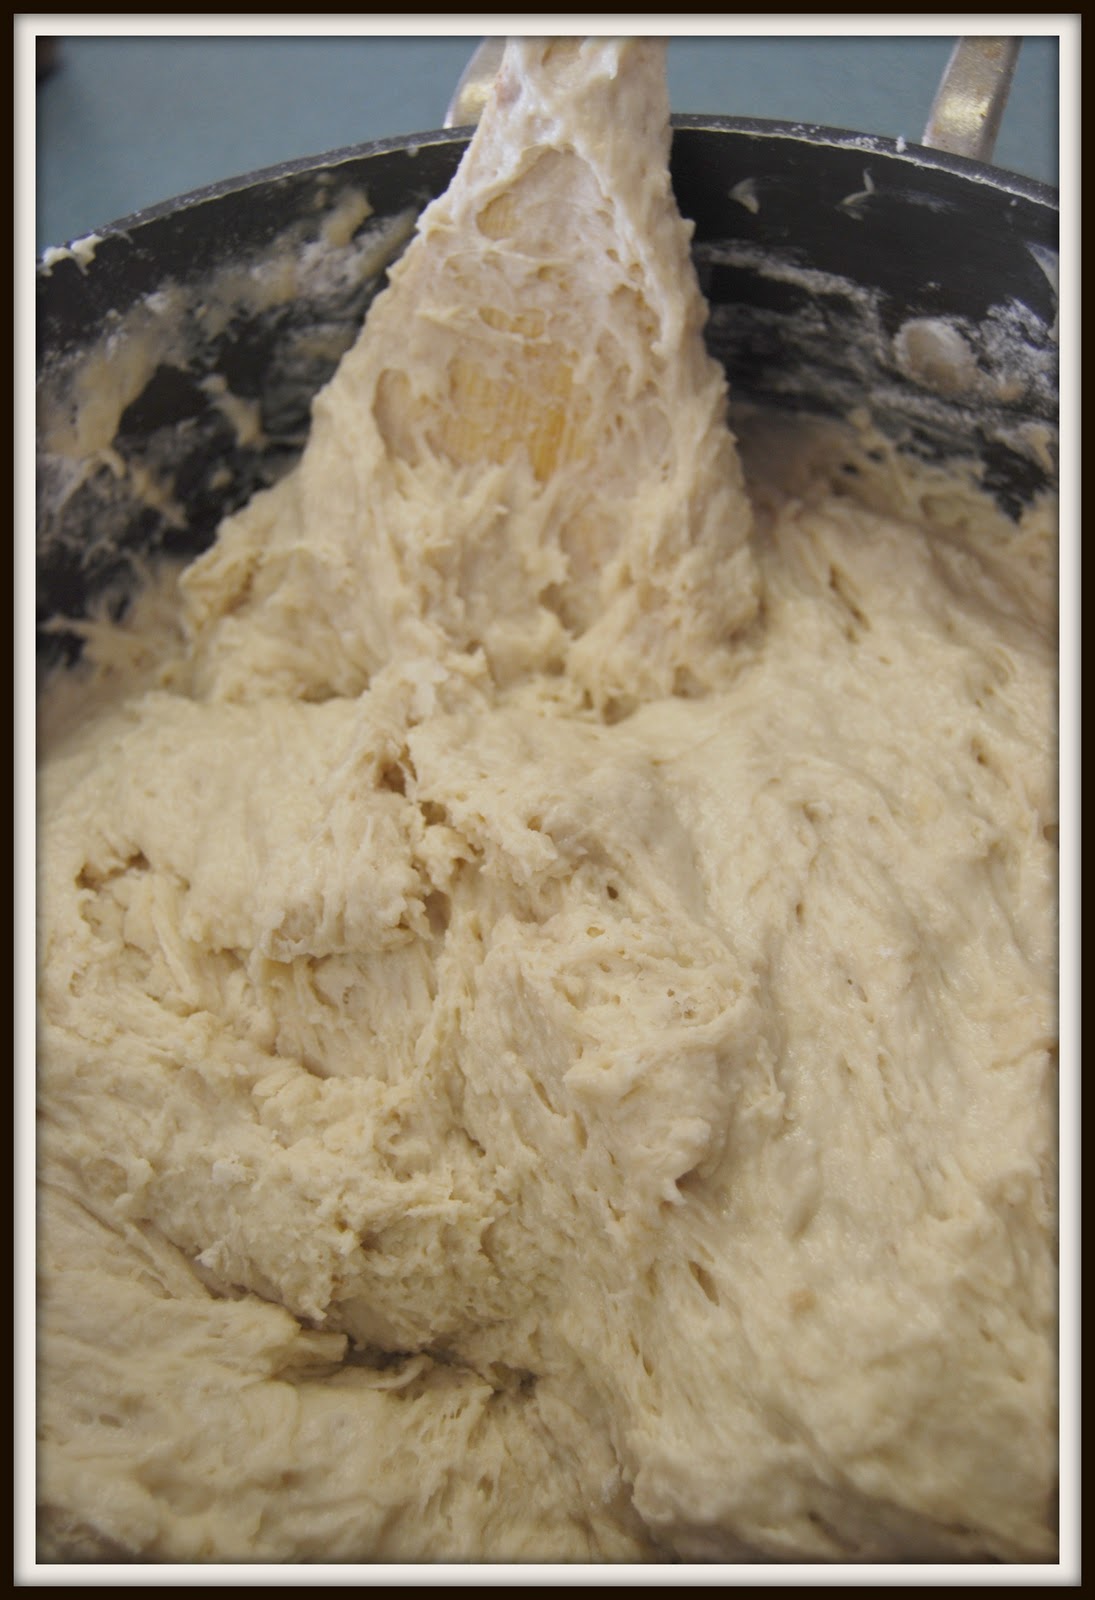
Then, add 8 cups of flour and stir until just combined. Top with a clean kitchen towel (You didn't know you'd have to do laundry before making these rolls, did you???) and let rise in a warmish part of your kitchen for an hour.

In the meantime, make lunch for your family who has been circling your work area ravenously for the last 20 minutes asking repeatedly, "Are they done yet? Can I have one yet? When are they going to be done?"
I would be disrespectful to my Type A alter ego if I didn't mention that I also use this time to clean up my work area, utensils, measuring cups, and all the other junk I've already used.
After the hour, pull the towel back. TA-DA!

A big, gooey yeasty smelling mass of dough. If you didn't burn your yeastie beasties. But, since you used the highly scientific method that I outline above, you didn't. And you have a nice big pot full of puffy dough.
Add the additional cup of flour, baking powder, baking soda, and salt. Stir well.
At this point, you can either put the dough into a mixing bowl and refrigerate until you're ready to make the rolls (up to 3 days), or you forge ahead.
I'm not patient afraid so I forge ahead. I knew you were waiting.
Break the dough apart into two portions. I put one portion back into the bowl and keep it in the fridge until I'm ready for it.

Put your butter -- oop, oop. Healthy alert! Healthy alert! REAL butter! Very healthy, right? Much better for you than that fake, processed, supposed to be like butter, solid at room temperature, spread junk. All natural. Less processed. Healthy.

Take that healthy butter and get it into a saucepan. Melt it over low heat. You'll need it in a minute.

On a well floured surface, roll out the dough. You obviously want it longer than wider, and rolled to a pretty thin rectangle. However, because I'm anal I have a hard time visualizing measurements accurately, I might have done something crazy like mark my counter. Then again, I might have just rolled blissfully. Not that I have any pictures to prove my attempt at perfection.

Nope. No pictures.
Now you'll need to get ready to create the yummy, delicious, and truly, truly healthy filling for the cinnamon rolls. There are just a few basic ingredients:

Melt the butter, and pour a cup of it over the rolled out dough. Use the back of a spoon or your fingers to spread it all around.

Sprinkle with half of the cinnamon...

...and half of the sugar.

Then begin to roll. This is the hardest/messiest part for me. I have a hard time making the roll nice and tight and so my rolls can be somewhat misshapen. Doesn't seem to make them any less delicious though, so I don't sweat it.

When you roll, do not be alarmed if some of the buttery,sugary, cinnamon-ness oozes out of the roll. That just means you've got enough of that delicious gooeyness in there!

Once rolled, cut into 1 1/2" slices. My slices always smoosh down so my rolls are oval shaped. Again, no worries. Doesn't effect the delicious factor at all!

Drizzle a bit of butter into each pan and then place the rolls.
Don't crowd 'em. Cinnamon rolls like their space. Plus, they'll grow considerably in the oven.

Bake at 350 for about 15 minutes. Take 'em out when they're light brown. Don't over brown the rolls.

While the rolls are baking, make the icing.

Whisk together the powdered sugar, milk, strongly brewed coffee, and melted butter. Add the maple flavoring. Stir until smooth and pourable. You want it thick-ish but still pourable. Add sugar and/or milk to get the desired consistency.

When the rolls come out of the oven, begin to pour the icing over the tops. That is, if you haven't sucked up all of the icing through a straw. Uh, excuse me. Dunno where that thought came from!
Pour the icing all around, making sure to coat each roll.

Then, when they've cooled a bit, wrap them nicely and deliver to those you love.

Or, tear into a pan. I mean, after all, you want to make sure you're delivering quality goods, don't you?? Once you've declared the rolls safe for consumption, then wrap 'em up and deliver them to the neighbors. You don't need to tell them how healthy these little babies are. I mean, seriously, doesn't everyone know that cinnamon rolls are filled with wholesome, natural, nutritious ingredients anyway?

So there you have it. Healthy and delicious sticky buns cinnamon rolls with maple icing.
Happy baking, sweet friends!
Enjoy!
Here's the free printable version of the recipe:

** Names have been changed to protect the innocent. But, Lucy, you KNOW who you are!
*** This recipe was taken from Ree Drummond’s cookbook, The Pioneer Woman Cooks, however I did put my own spin on it. She never, not once, has called these little bites of glory “healthy", nor extolled the virtue of their wholesome ingredients!
Wednesday, December 14, 2011
Endless Summer
One of the big perks about living in Florida is that the weather is beach-worthy pretty much all year.
And that's a great thing.

Until it's time to go.
Then?
Then it's not such a great thing...

And that's a great thing.

Until it's time to go.
Then?
Then it's not such a great thing...

Saturday, December 10, 2011

Friday, December 9, 2011
Best 3 Minutes of the Season!
I posted this last year, but I so love it that it's back for a replay.
First, click the four arrows heading outward that are in the lower right corner.
Then click the play arrow.
Trust me.
It's worth it!
Wednesday, December 7, 2011
I did it!
A while back, I posted a product review as part of an interview process for something called Molly's Home Team.

Guess what?
I made the cut!
I'm so excited! Thank you to those of you who became blog followers as part of my review process. I look forward to telling you more about lots of fun and interesting products!
Oh, and in case you're wondering who Molly is...
I've got the deets for you...

Guess what?
I made the cut!
I'm so excited! Thank you to those of you who became blog followers as part of my review process. I look forward to telling you more about lots of fun and interesting products!
Oh, and in case you're wondering who Molly is...
I've got the deets for you...

Tuesday, November 29, 2011
Merry, Merry
I am looking at all of our Christmas decoration storage bins with a bit of trepidation. And excitement.

I'm thinking we'll go for this look this year:

What do you think?
I think the Sharpie marker arrow just makes the decorations pop, don't you?
Hope you are enjoying your Christmas preparations. Including the preparation of your heart to receive the greatest gift we've ever been offered -- Jesus Christ.
I'm off to unpack the boxes and let the Merry begin...
Thursday, November 24, 2011
So Good It'll Make You Wanna Slap Yer Granny!
I don't know why I had to title the post that, but I just did. A woman I love dearly says that and it makes me smile every time. And this recipe definitely qualifies.


Definitely.
Clean Chicken Taquitos and Fresh Pico De Gallo.
Is your mouth watering just reading the title of the recipe? It should be. Unless it's early in the morning. Then your mouth might not be watering. Your eyes? Yes. Mouth? Maybe not.
So let's pretend it's afternoon and you're asking yourself, "What will I feed the fam?" Well, I've got you covered!
As I mentioned recently, we have begun to eat clean. Well, I'm eating clean. The family is eating clean-ish. But they all loved this one. Except Princess Picky-Pants. She didn't even try it. But her idea of delicious is ravioli from a can. (ICK! Totally not clean. But a treat she does enjoy from time to time, much to my chagrin!)
These were so good that I actually jumped up after dinner AND MADE ANOTHER BATCH. To freeze. Yes, they were that good. I don't know about you, but making a second dinner after cooking and eating the first isn't on my top 10 list of "faves." Neither is cleaning up after cooking, but that's another story...
You'll have to excuse the lack of photos. I was in a cooking frenzy and we ate these before I even thought to shoot a photo or two. And when I tried to shoot photos of the second batch of taquitos, it was too dark in the kitchen. And I think I had every single pan, bowl, and measuring utensil I own on the counters. So, I borrowed some images from Google. I noticed the same photos on several blogs/websites and I'm not sure who to give credit to. If these are your images, I'm sorry I didn't give you proper credit. But your pictures? Yum! These look remarkably like what I made. I love it when that happens.
Okay. Enough chasing rabbits. Let's get to the recipe, shall we?
Taquitos:
(taquito recipe adapted from The Gracious Pantry)
Makes 12 taquitos
12 Clean Corn Tortillas (I used Food for Life brand)
2 lbs. boneless, skinless chicken breast
1 jar Clean salsa
2 Tbs. Onion Powder
1 1/2 Tbs. Garlic Powder
1/2 Tbs. Garlic Salt

Pico De Gallo:
(No ingredient amounts are given because you can make as much or as little of this Pico as you’d like, and you can vary the different ingredients to get the taste you enjoy. Also remember to taste and season to your preference.)
plum tomatoes
yellow onion
fresh cilantro
jalepeno
garlic powder
course salt
lime juice
Directions:
- Place chicken breasts and salsa in a crock pot and cook on high for 3 hours or on low for 4-5 hours. (This is called Salsa Chicken in our house and some evenings we eat it straight from the pot like this. But not this night!)
- Preheat oven to 400º.
- Remove chicken from crock pot and shred. Return to crock pot and stir to incorporate all the salsa juices into the shredded chicken.
- Wrap tortillas in a wet paper towel and warm in the microwave until very pliable.
- Put chicken in a food processor and add garlic powder, garlic salt, and onion powder. Process until a “dough” is created. If the mixture is too dry, add a bit of the salsa juice from the crock pot.
- Take a warm tortilla, add a bit of chicken mixture, and roll.
- Place in a well misted (with an oil mister/sprayer) pan.
- Continue to stuff and roll until all the tortillas are filled.
- Spray rolled tortillas with an oil mister. This is where the crunch will come from!
- Bake at 400º for 20 minutes, or until lightly browned and crispy.
- Serve with fresh Pico De Gallo. I also served it with the Pico mixed into a mashed avocado as a fresh guacamole.
- Enjoy!
Sunday, November 20, 2011
Self Portrait
Seems like I'm always behind the camera and never in front of it. Most self portraits I've tried have come out pretty bad. Too posed. Too uncomfortable looking. Too lame.
Until now...

Note to self: Shooting one's own picture in the side of an uber-shiny fire engine does wonders for one's self esteem. I'm not even going to try to figure out how that bendy metal made me look so tall and thin! And curvy in just the right places. And thin. I'm just gonna take it, smile, and say, "ThankyouVERYmuch, shiny red fire engine! You have made my day!"
Who's the siren now???
Wednesday, November 16, 2011
Misto -- Product Review

We have recently begun to eat "clean." That simply means that we are eating and preparing foods (and man, there are a lot of them!) that are as close to God's creation as possible. Fruits, veggies, grains, lean proteins; nothing processed. It's been quite a delicious adventure!
One of the things I knew I'd need to help prepare our clean meals was an oil sprayer. I've seen them in many locations, but I knew I wanted a durable version. So I went to the local housewares store and purchased one. The Mikasa Misto was $9.99 and came in two color choices -- stainless steel, or red. Though I've since seen them online in a rainbow of colors, when at the store, I chose stainless steel.

I have to admit that I was a little skeptical about spraying with oil. I thought there would be too much oil on the food and in the pans I was using. I was wrong! After filling the Misto with a small amount of oil, I re-capped it, and pumped the lid. After about 6 pumps, the lid became resistant, or "firm" as the directions said it would. I knew it was ready. Holding it over my small pan, I pressed the trigger. And was surprised! A fine mist of oil came out of the nozzle and coated the pan. No drips! No gunk on the nozzle!
We have used the Misto in our stovetop pans, on our BBQ grill, on our waffle maker, and to lightly coat veggies before we season them and throw them on the grill. I have been quite happy with the Misto's performance. I'm also happy that I seem to be saving money on olive oil since I am using much less than if I'd poured it directly in the pan. I also like that I know exactly what I am spraying into my pan. No scientific sounding chemicals, preservatives, or whatever else they put in that can! The Misto is very easy to use and the kids have enjoyed spraying with it, as well.

There are a couple things about the Misto that I'm not thrilled with. When the unit has been freshly primed, the first couple seconds of oil that come out seem to be pretty large drops. After those first few seconds, the spray is more like a fine mist, which I prefer. Another thing that I don't care for is that the Misto will only spray for about 8-10 seconds per prime. For us, that means only coating one pan or the waffle iron before a second prime. When using Misto on larger jobs such as the grill or on veggies, I have found that I have to put the lid back on and pump the lid to get the oil primed and ready to spray. Not a huge issue, but something to get used to after using the no-stick-junk-in-a-can.

All in all, I'm quite happy with my purchase of the Misto. In fact, we've started calling him the Mr. Misto around our house. Using less oil, easy to use, and nice to look at. What more could I want?
The Misto can be purchased at many locations including World Market, Bed, Bath and Beyond, and Amazon to name a few. Prices and colors will vary.
This is not a paid product review. I purchased the Misto and have reviewed it as part of an interview process for Molly's Home Team, which is a component of The Old Schoolhouse Magazine. Any opinions expressed are completely mine, and I have not, nor will I, receive compensation for this review.
Monday, November 14, 2011
Another bird...
I had another opportunity to shoot some family photos at the beach this past weekend.
In addition to getting some great shots of the family, I also had several very cooperative herons.
One of the herons seemed to be stalking the family dog, but that's another story for another day...

Be blessed!

In addition to getting some great shots of the family, I also had several very cooperative herons.
One of the herons seemed to be stalking the family dog, but that's another story for another day...

Be blessed!

Thursday, November 10, 2011
Come, Follow Me

I recently applied to be a product reviewer -- in other words to review a product, honestly and publicly, on my blog. I passed the first round!
Now on to the second round, writing a review. That will come in a few days. But there is something to be done now.

One of the specifications of "making it" past the second round is to have at least 50 public followers on my blog. As of this writing, I don't yet have that many. But I know you're there. I can see you blog-stalking...
So, would you please be so kind as to go to the right sidebar, scroll down to the Followers section and click on the "Join This Site" tab? I would be so thankful if you'd let me know you're here looking around.

I feel a bit silly asking you to follow me... All I can hear are Jesus' words in the gospels: "Come, follow me," Jesus said, "and I will send you out to fish for people." Mark 1:17
Well, I do follow Him, and I did pray about this opportunity before I applied for the position, and so now, all I can figure is that God is keeping His word. He's sending me out to fish for people.

So, come follow me...

Subscribe to:
Posts (Atom)


